My Docker Learning Notes
Last updated:
1. Introduction
This material was creating to facilitate my learning in a pragmatic and efficient fashion - no fluff about! I’m confident it could do the same way for you.
I’ve been a software engineer for the most part of the last 25 years and although, I haven’t been using Docker full time, I did spend a fair chunk of time getting to know it pretty well. I would argue that if you use Docker fulltime, you’re probably using the wrong tools. 😄
1.1 About
1.1.1 Another one?!
There are lots of Docker resources (books, tutorials, etc.) out there - and I mean a lot of them! And most of the time they’re playing it safe by not deviating from the “tried routes” of writing a technical resource.
I’m aiming to create an engaging and straight-to-the-point alternative, to get me/us to be dangerous enough in the shortest time possible.
My second intent is to use it as a reference guide for when I need to look something up and, rather than wasting time searching, I’ll just come back here and search within my site.
1.1.2 Audience
This resource is aimed at developers of all skills. If this is the first time you’ve ventured into programming, you’ll need to put in some extra work.
1.2 Tools
Here is a list of tools I’m going to be using:
- Terminal - for the most part we’re going to use the terminal - all major Operating Systems (OS) come with decent terminals.
- Docker Desktop - it includes all the required Docker tools - download it for your platform from https://docs.docker.com/get-docker/.
- For some parts, a paid Docker Pro subscription will be required.
- Visual Studio Code (or VS Code for short) - by far the most popular editor used by the developer community - download it from https://code.visualstudio.com/.
You can use any text editor you like but VS Code comes with a thriving ecosystem of themes and extensions that makes our lives easier - here are a one that makes our learning easier and faster:
- Docker extension from Microsoft - makes it easy to create, manage, and debug containerized applications - download it from: https://marketplace.visualstudio.com/items?itemName=ms-azuretools.vscode-docker
The current version of Docker, at the time of writing, is: v.24.0.7
docker version
Client: Docker Engine - Community
 Version:           24.0.7
 API version:       1.43
 Go version:        go1.21.3
 Git commit:        afdd53b4e3
 Built:             Thu Oct 26 07:06:42 2023
 OS/Arch:           darwin/arm64
 Context:           desktop-linux

Server: Docker Desktop 4.27.2 (137060)
 Engine:
  Version:          25.0.3
  API version:      1.44 (minimum version 1.24)
  Go version:       go1.21.6
  Git commit:       f417435
  Built:            Tue Feb  6 21:14:22 2024
  OS/Arch:          linux/arm64
  Experimental:     false
 containerd:
  Version:          1.6.28
  GitCommit:        ae07eda36dd25f8a1b98dfbf587313b99c0190bb
 runc:
  Version:          1.1.12
  GitCommit:        v1.1.12-0-g51d5e94
 docker-init:
  Version:          0.19.0
  GitCommit:        de40ad0
1.3 Conventions
- Terminal commands will be shown with a terminal prompt and output - the command output is shown in green. You have already encountered an example of this above when looking at the Docker version.
- Code snippets will be shown with syntax highlighted:
const express = require('express')
const app = express()
const port = 3000

app.get('/', (req, res) => {
  res.send('Hello World!')
})

app.listen(port, () => {
  console.log('my-app is running on port ${port}')
})
1.4 Feedback
I will be forever thankful if you could spare couple of minutes of your time to send across any suggestion, corrections, disagreements, etc.
Please drop me them in an email to paul@en5.dev or DM me on Twitter at @pardel.
Thank you! ONWARDS!
2. Docker Basics
2.1 Concepts
- Docker – management tool for the items below.
- Image – a blueprint for building containers; self-container definition that includes everything needed to run an app.
- Container – an independent running environment, created based on an image; multiple containers can be created based on an image.
- Volume – persistent storage that is attached to container to prevent data loss when containers are stopped (containers have a virtual file system).
Why use Docker containers?
- Isolation (black box) – everything is inside a docker image; your machine doesn’t get polluted with libraries that are required just for one application. In the same way, no conflicts if different apps require different versions of the same library.
- Simplicity / Consistency – your production environment will mirror your dev environment – no more mismatch versions or missing dependencies surprises.
- Ease of use / Shared OS – all containers share the same resources (they share the OS kernel). I.e. containers don’t need to be assigned or reserved specific resources in the host system.
- Collaboration / Flexibility / Image inheritance – your image will be built on top of other predefined images making it easier to perform basic tasks (eg. Install a Node.js environment). You get to customise everything you want.
Docker uses a client-server architecture:
- The server, called the “Docker Engine”, runs on the host machine and is responsible for the management of Docker images and containers (we’ll cover them in the next 2 chapters). The Docker Engine runs as a continuous background process (daemon) that exposes a RESTful API used by the client.
- The client is a command-line interface (CLI) tool that allows users to interact with the Docker daemon, sending commands to build, run, and manage Docker containers and images.
2.2 Installation
Go to https://docs.docker.com/get-docker/ and download the package for your platform. Once installed, make sure to run it. You can check if everything is ok by running docker version in a terminal:
docker version
Client: Docker Engine - Community
 Version:           24.0.7
 API version:       1.43
 Go version:        go1.21.3
 Git commit:        afdd53b4e3
 Built:             Thu Oct 26 07:06:42 2023
 OS/Arch:           darwin/arm64
 Context:           desktop-linux

Server: Docker Desktop 4.27.2 (137060)
 Engine:
  Version:          25.0.3
  API version:      1.44 (minimum version 1.24)
  Go version:       go1.21.6
  Git commit:       f417435
  Built:            Tue Feb  6 21:14:22 2024
  OS/Arch:          linux/arm64
  Experimental:     false
 containerd:
  Version:          1.6.28
  GitCommit:        ae07eda36dd25f8a1b98dfbf587313b99c0190bb
 runc:
  Version:          1.1.12
  GitCommit:        v1.1.12-0-g51d5e94
 docker-init:
  Version:          0.19.0
  GitCommit:        de40ad0
2.3 Dockerise a Web App
I believe in “getting your hands dirty” as soon as possible, so, in this section, we’ll take a simple app and “dockerise” is. We will see what that process involves and use some of the concepts we’re going to explain in the next chapters in the book.
2.3.1 The App
We will be creating a simple Node.js web app using the Express library.
You will need to have Node.js installed - I’m using v.20.10.0 but any new-ish version will do. To check what version you have installed use:
node -v
v20.10.0
If you don’t have it installed, visit nodejs.org/en/download to find how to do that.
Let’s create the app:
- Navigate to our
Documentsfolder (or equivalent for Windows):
cd ~/Documents- Create a folder named
my-appto host the app:
mkdir my-app- Navigate into the
my-appfolder:
cd my-app- Run
npm initto create apackage.jsonfor the app:
npm init -y
Wrote to /Users/paul/Documents/my-app/package.json:

{
  "name": "my-app",
  "version": "1.0.0",
  "description": "",
  "main": "index.js",
  "scripts": {
    "test": "echo \"Error: no test specified\" && exit 1"
  },
  "keywords": [],
  "author": "",
  "license": "ISC"
}- Add the express library:
npm install express

added 62 packages, and audited 63 packages in 3s

11 packages are looking for funding
  run `npm fund` for details

found 0 vulnerabilities- Create a file named
index.js– it will be the entry point for the app (see output above):
touch index.js- Open the project is VS Code (or other IDE or text editor of your choice):
code .- Open
index.jsand add the following lines:
const express = require('express')
const app = express()
const port = 3000

app.get('/', (req, res) => {
  res.send('Hello World!')
})

app.listen(port, () => {
  console.log('my-app is running on port ${port}')
})
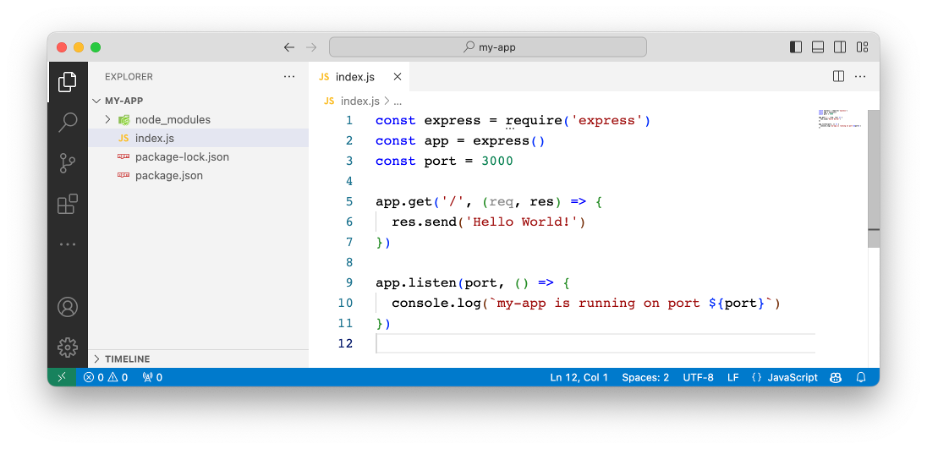
Run the app – in terminal:
node index.js
my-app is running on port 3000
Open a browser window and navigate to http://localhost:3000/ - the “Hello World!” message will be show:

NB: Any changes to the source code will require a restart of the server – tools like nodemon are available if you’d like to experiment.
- Make sure to stop the server before proceeding to the next step.
2.3.2 Building an Image
The process a “dockerising” an app starts with creating a Dockerfile, a simple text file contains instructions to be used by Docker to package the application into an image.
Chapter 3 covers Docker images – at a high level, an image contains:
- A stripped-down OS (only the things required to run the app)
- The app we’re building
- 3-rd party dependencies
- Environment variables
The Dockerfile
- It is usually placed inside your app folder at the top level - its name,
Dockerfile, is a convention and can be any valid filename. - Will need to include the following instructions:
- An OS to run that included platform dependencies - Node.js in our case.
- Installed app dependencies via
npm install - Copy the app files across - only
index.jsfor our app. - Run the start command -
node index.js.
Create a file named Dockerfile, at the top of our app structure, with the following content:
FROM node:alpine

## Install app dependencies
COPY package.json .
RUN npm install

## Copy app source code
COPY index.js .

## Expose port
EXPOSE 3000

## Start Application
CMD ["node", "index.js"]
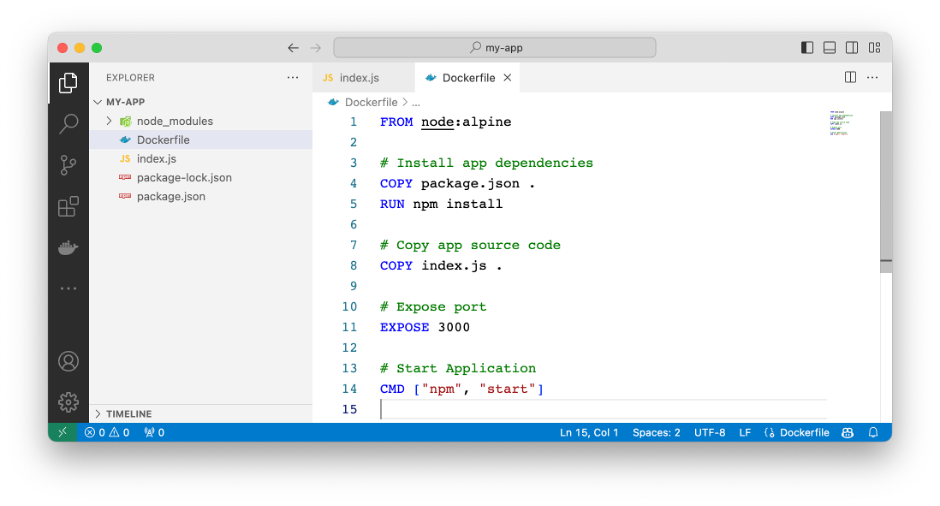
Run the following command to build an image for our project:
docker build -t my-app .
[+] Building 19.0s (10/10) FINISHED                        docker:desktop-linux
 => [internal] load .dockerignore                                          0.1s
 => => transferring context: 2B                                            0.0s
 => [internal] load build definition from Dockerfile                       0.1s
 => => transferring dockerfile: 233B                                       0.0s
 => [internal] load metadata for docker.io/library/node:alpine             2.2s
 => [auth] library/node:pull token for registry-1.docker.io                0.0s
 => [1/4] FROM docker.io/library/node:alpine@sha256:a8beafd69068c05d0918  13.5s
 => => resolve docker.io/library/node:alpine@sha256:a8beafd69068c05d09183  0.0s
 => => sha256:df05226f86d249aee174ac8d9aef6fd559a5b2aae57 1.16kB / 1.16kB  0.0s
 => => sha256:6a28ec2adefbad5b790c6c86721c8eb39795c77efb3 7.15kB / 7.15kB  0.0s
 => => sha256:bca4290a96390d7a6fc6f2f9929370d06f8dfcacba5 3.35MB / 3.35MB  0.7s
 => => sha256:1addaa6b9e454d168497e681e1f0a4852270d6e3 43.23MB / 43.23MB  12.2s
 => => sha256:50e303709daab332239871e5107eb44c5f4c317934c 2.37MB / 2.37MB  0.7s
 => => sha256:a8beafd69068c05d09183e75b9aa679b520ba68f94b 1.43kB / 1.43kB  0.0s
 => => extracting sha256:bca4290a96390d7a6fc6f2f9929370d06f8dfcacba591c76  0.1s
 => => sha256:e13d12776e46fd6868ed836ddf5a85a59e4ef440c774a24 449B / 449B  1.0s
 => => extracting sha256:1addaa6b9e454d168497e681e1f0a4852270d6e30bd9f624  1.1s
 => => extracting sha256:50e303709daab332239871e5107eb44c5f4c317934cbb47f  0.0s
 => => extracting sha256:e13d12776e46fd6868ed836ddf5a85a59e4ef440c774a244  0.0s
 => [internal] load build context                                          0.0s
 => => transferring context: 565B                                          0.0s
 => [2/4] COPY package.json .                                              0.2s
 => [3/4] RUN npm install                                                  3.0s
 => [4/4] COPY index.js .                                                  0.0s
 => exporting to image                                                     0.1s
 => => exporting layers                                                    0.1s
 => => writing image sha256:9541a3ce7b9f3402a4fa45ea02c72c0ff99e19c162571  0.0s
 => => naming to docker.io/library/my-app                                  0.0s
View build details: docker-desktop://dashboard/build/desktop-linux/desktop-linux/0lv3gxpjvvtzwesnuaudrstk2
Depending on your computer specs and internet connection speed, this might take a while. The newly created image is not store inside the app folder but inside the Docker library. To see it use the docker images command:
docker images
REPOSITORY   TAG       IMAGE ID       CREATED         SIZE
my-app       latest    cfd4dcdda3ea   6 seconds ago   146MB
2.3.3 Running the App
docker run -d my-app
6de639cc93b450763d590d9e17d0b851b04b4faa3f53edb8f0b6d4a4c2c2f621
That’s it! We have a Node.js web app running in a container. The -d flag allows the container to run in the background.
Available containers can be listed via:
docker container ls -a
CONTAINER ID   IMAGE     COMMAND                  CREATED          STATUS          PORTS      NAMES
6de639cc93b4   my-app    "docker-entrypoint.s…"   18 seconds ago   Up 18 seconds   3000/tcp   heuristic_kalam
NB: You might be tempted to load http://localhost:3000 in a browser and expect to find the app running – unfortunately, this is not possible with our current setup as the container’s port 3000 is not “exposed” to the Docker host (your computer). We’ll learn about that in the next chapters.
2.4 Docker Desktop
So far, we’ve been using the Docker CLI. A great way to visualise your images and containers is via the Docker Desktop app – launch it and select Containers area from the left menu:
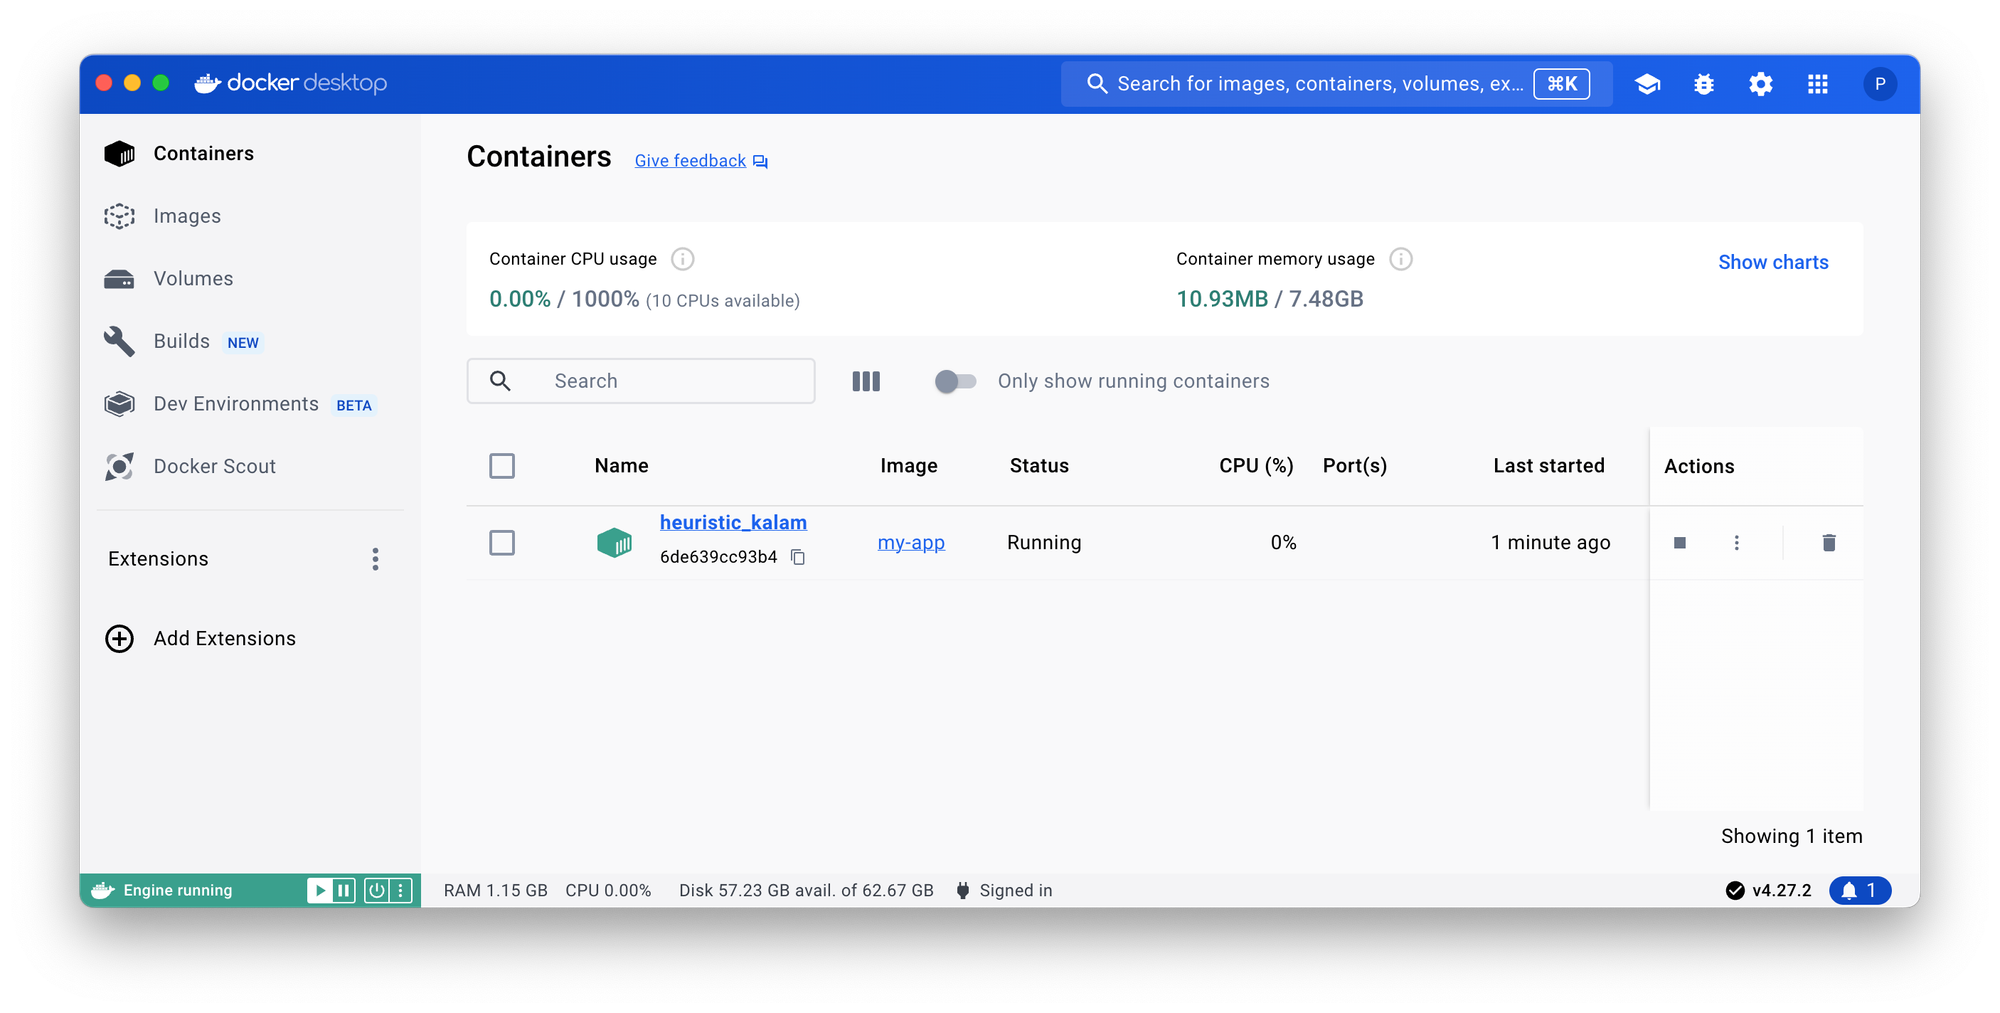
Notice our Container running from the my-app image. As we didn’t specify a name when running it, a random one was assigned (heuristic_kalam in my case).
Click on it to see its details:
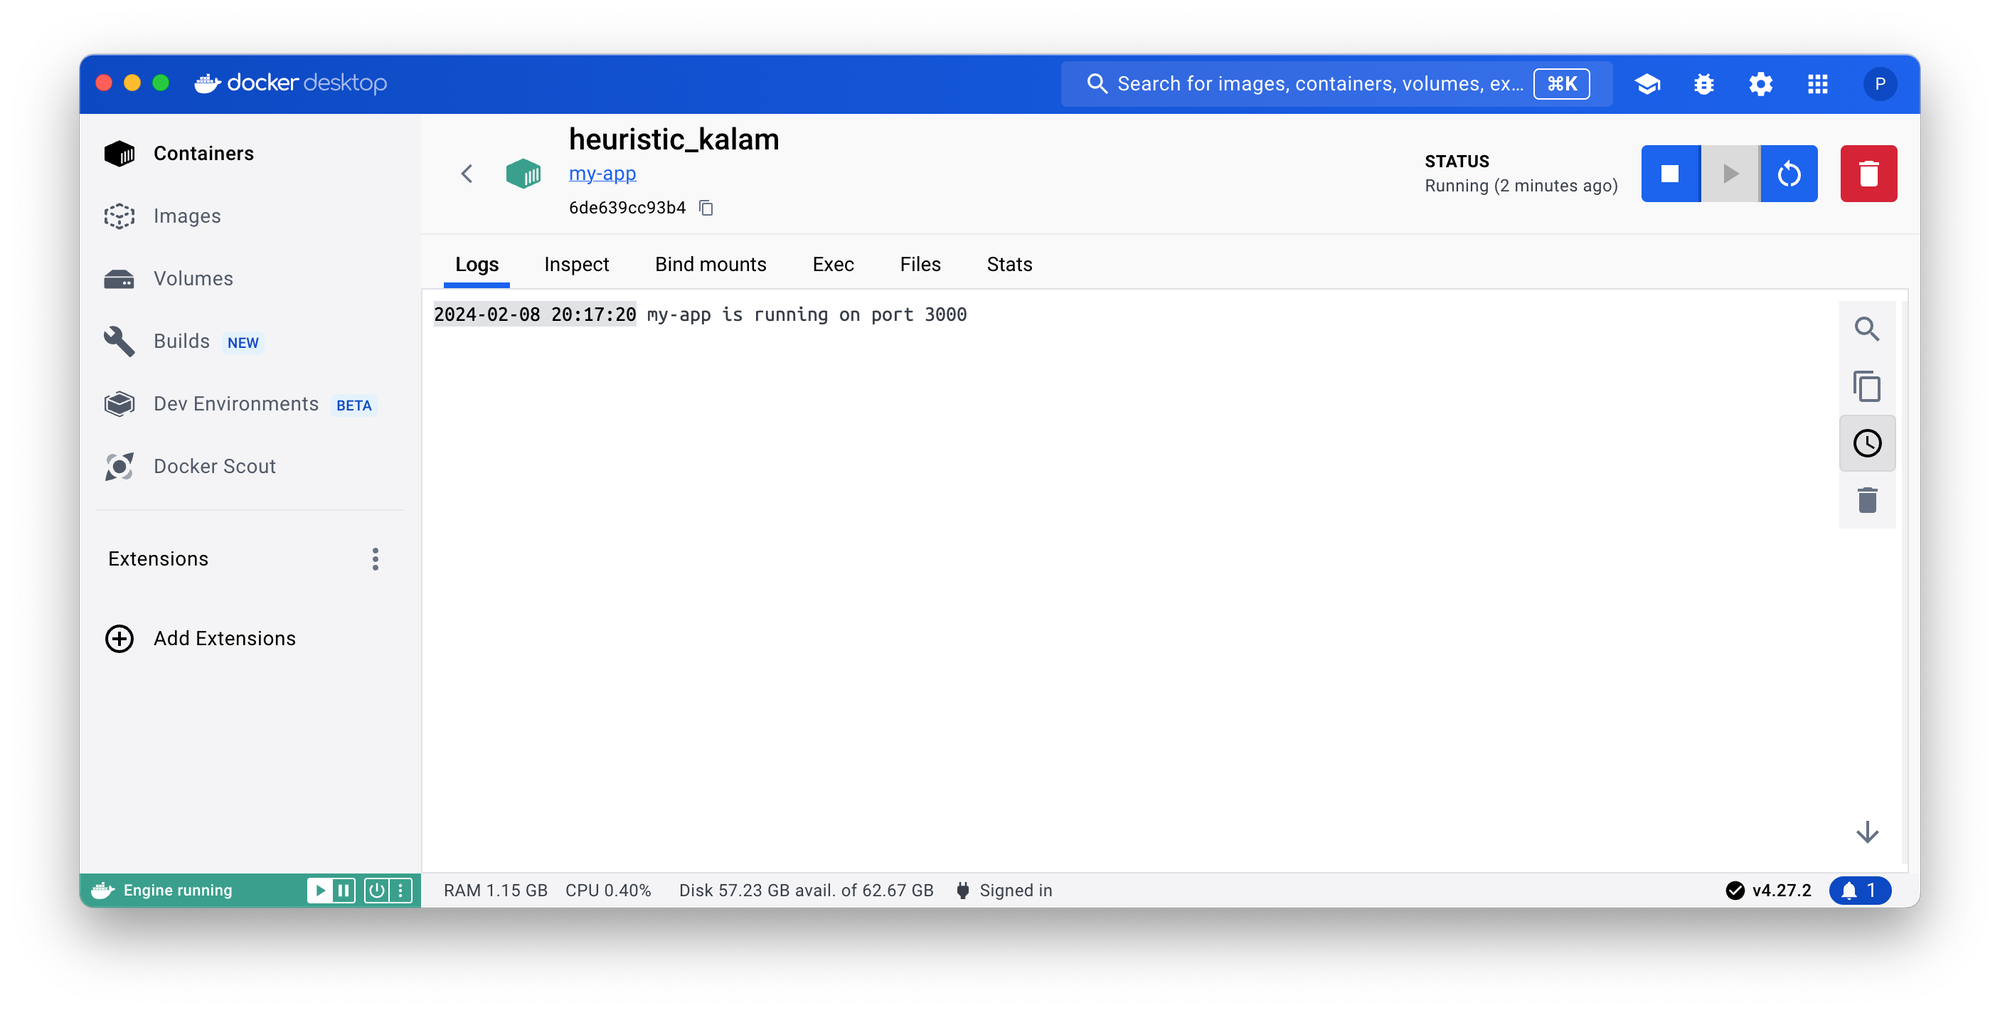
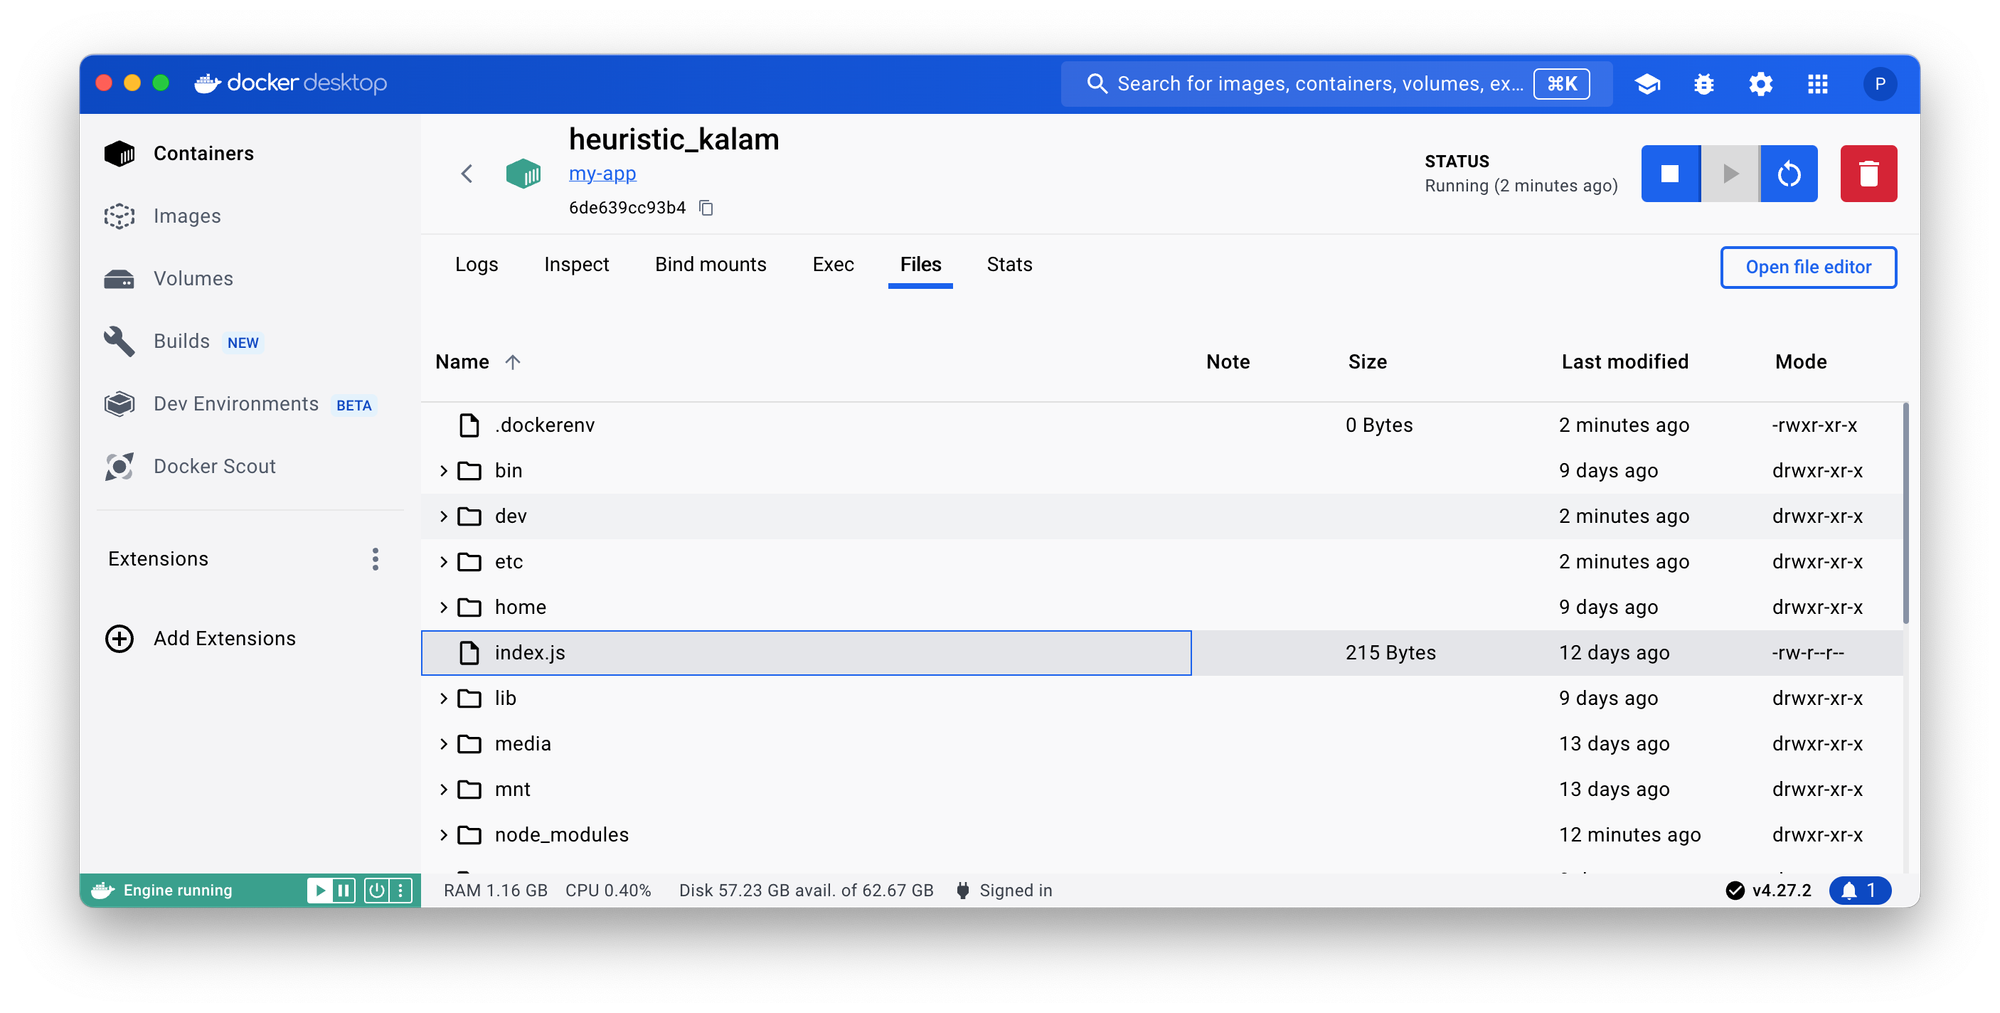
Selecting the Files tab will show the Containers files – notice that our index.js is at the OS top level – not the best place for it – we’ll find a different place for it later.
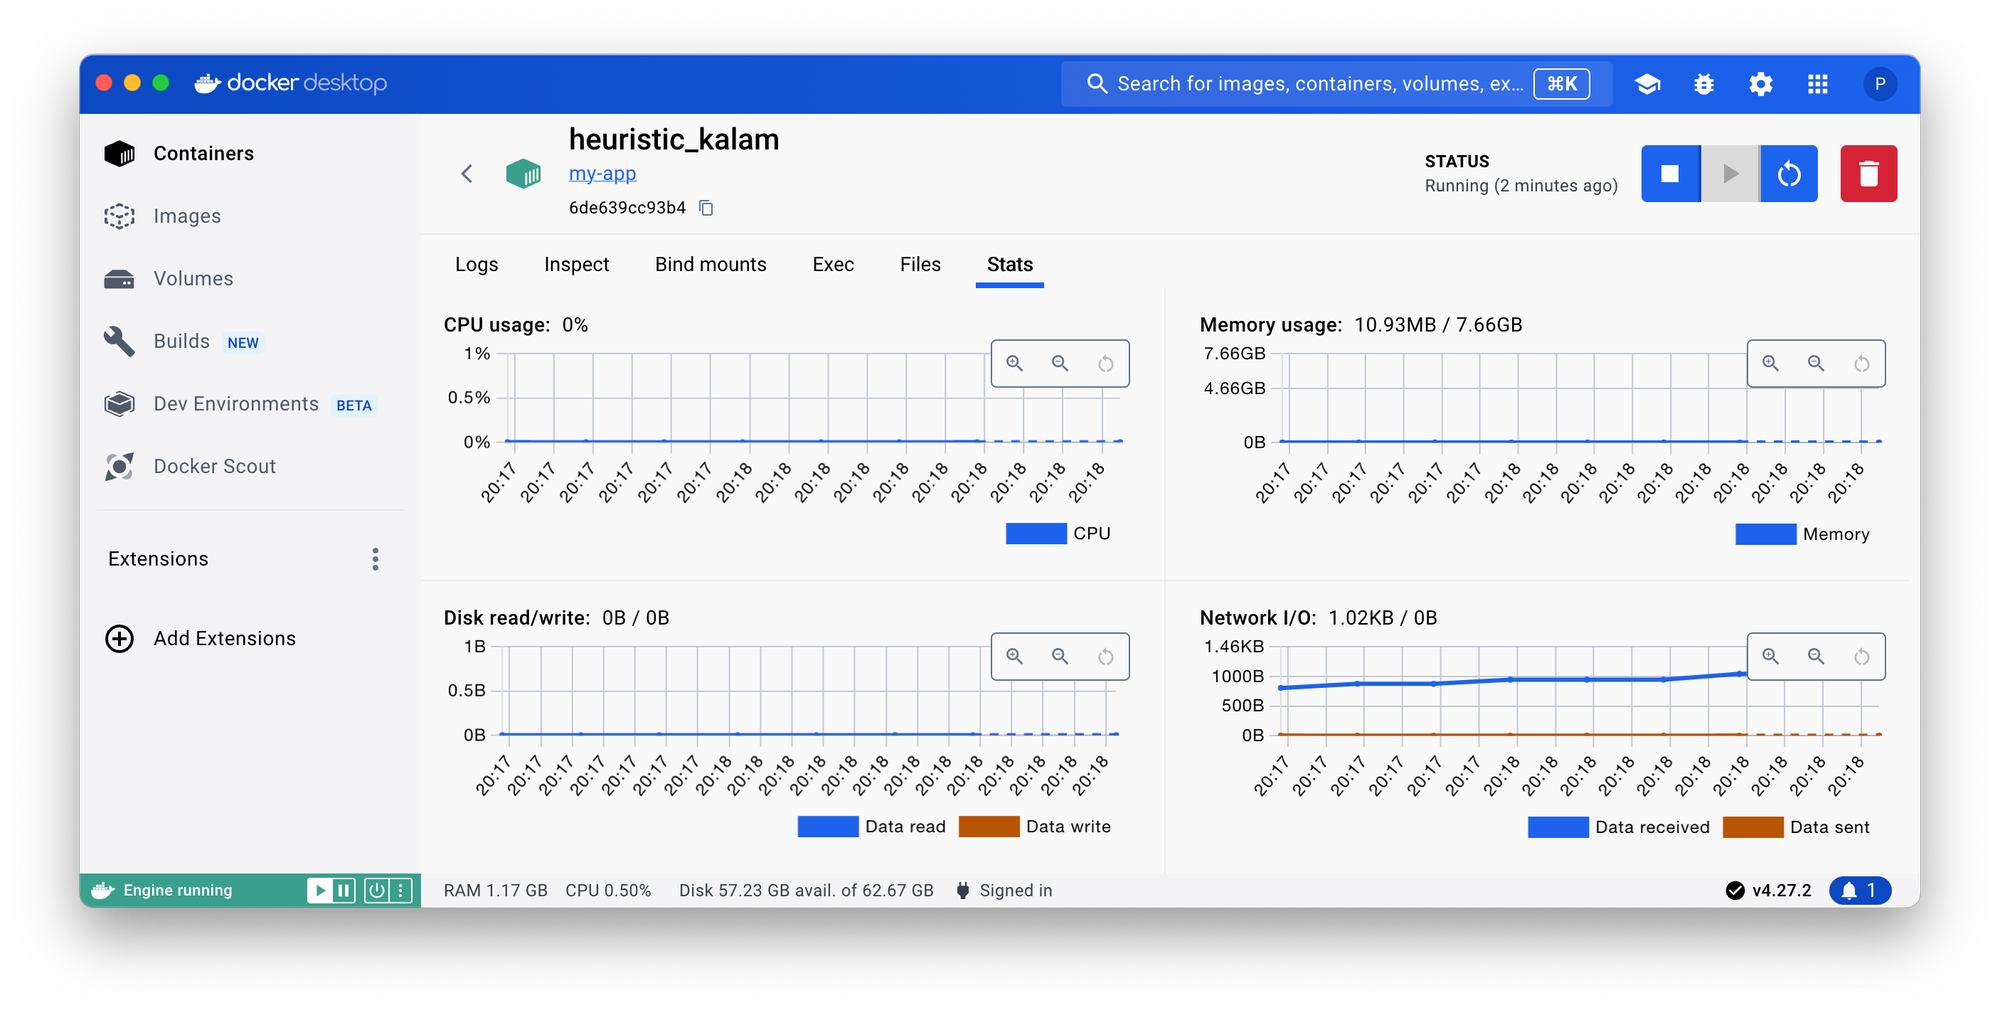
The Stats tab contains useful information about the resources used by the container:
That’s it! Well done!
You created a Node.js web-app, dockerise it and run it in a container.
We’ll now look in details at each of the Docker concepts we used above – let’s start with images.
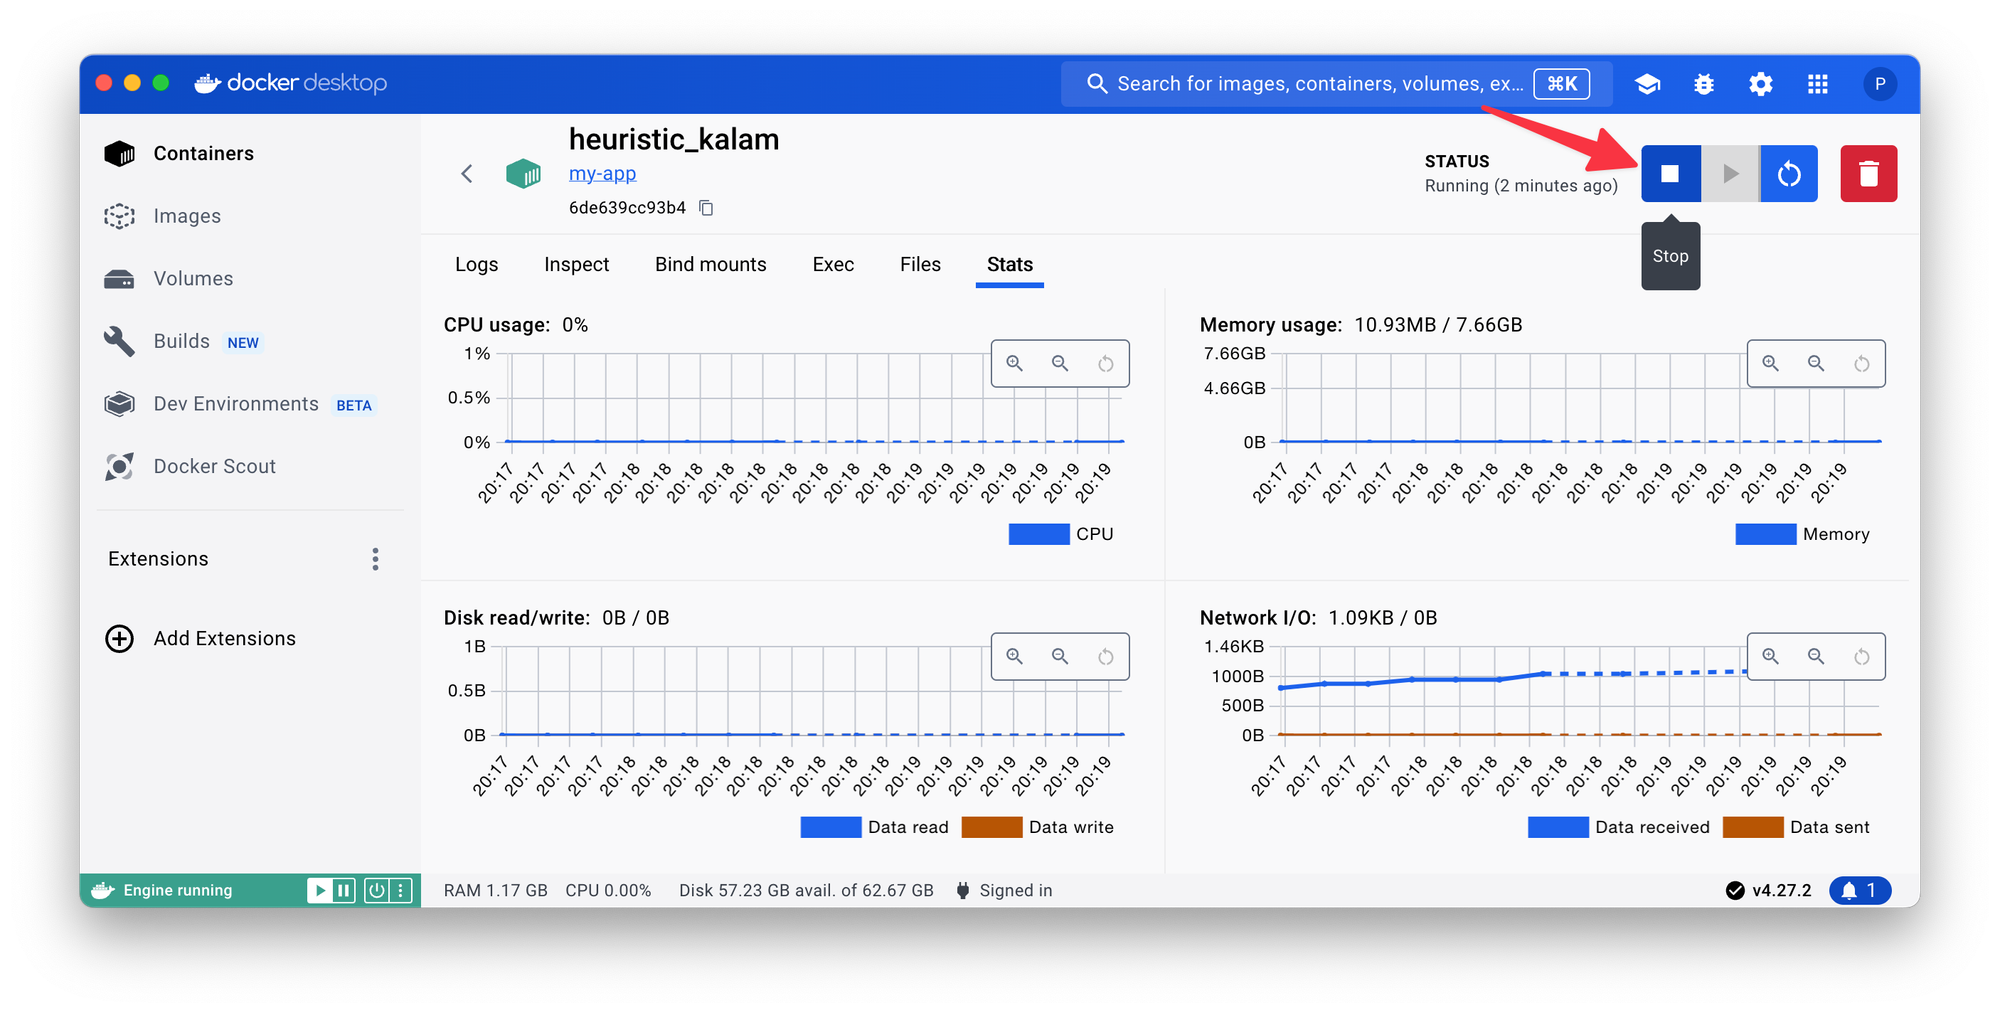
But before doing that, let’s stop the container using the Stop button:
3. Docker Images
Docker images are templates used to create containers – they contain the application code, libraries, dependencies and any other files needed for the application to run.
3.1 Pulling an Image
The docker pull command is used to download an image or a repository from a registry.
docker pull ubuntu
Using default tag: latest
latest: Pulling from library/ubuntu
ce9ebea987c2: Pull complete
Digest: sha256:e6173d4dc55e76b87c4af8db8821b1feae4146dd47341e4d431118c7dd060a74
Status: Downloaded newer image for ubuntu:latest
docker.io/library/ubuntu:latest
In the example above the “latest” version is retrieved - tags can be specified where a particular version is required:
docker pull ubuntu:20.04Why you would want to pull an image:
- getting base images for development, to be later used by your app Dockerfile.
- update images to their latest version – in the example above the ubuntu version is the latest when not specified.
- used in production to fetch the latest stable version of the application image from a registry.
3.2 Docker Hub
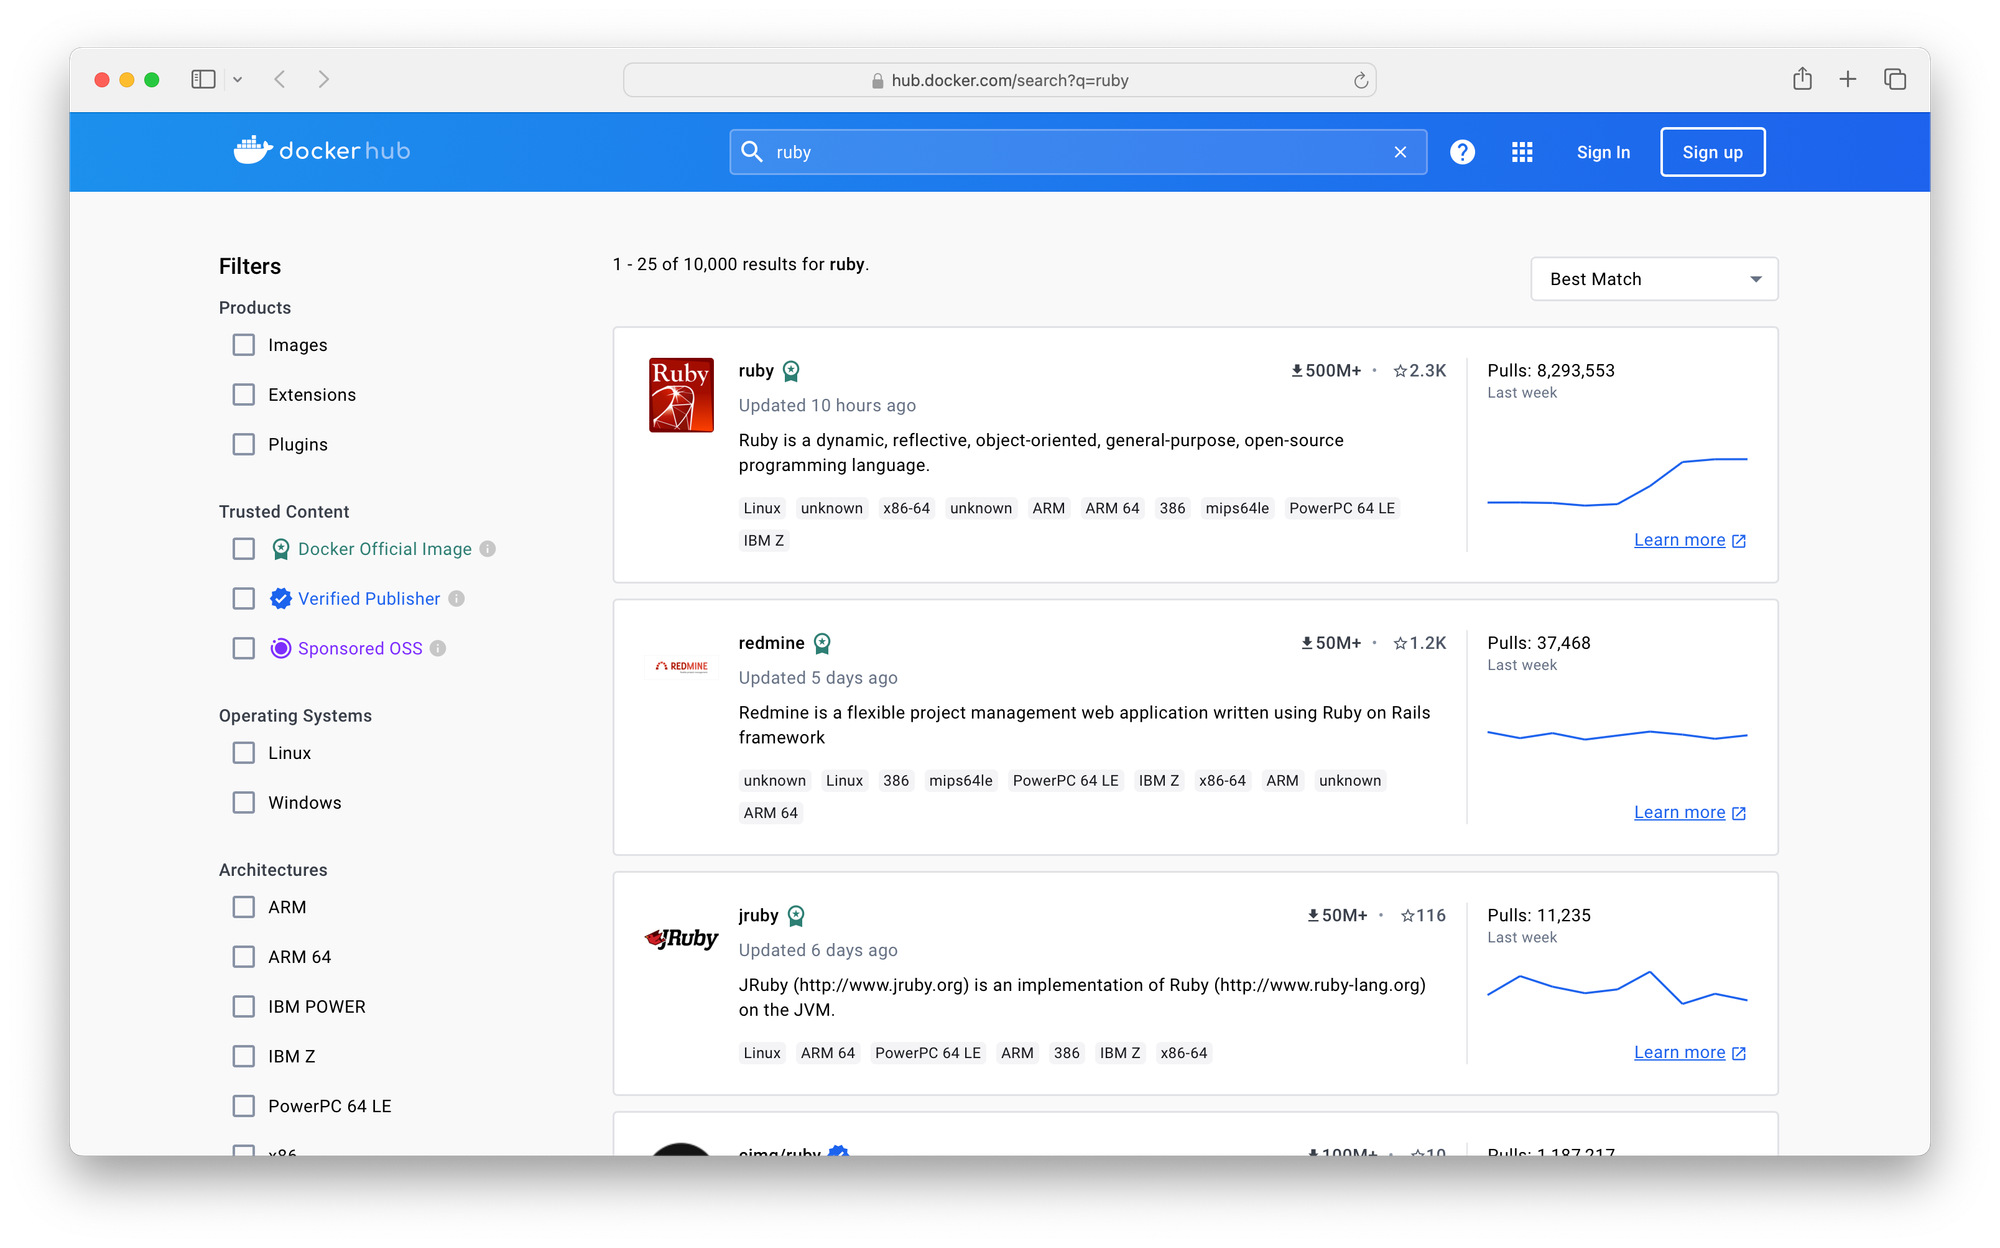
Starter images for lots of use-cases are available on hub.docker.com via the search functionality in the top bar. Here is an example for Ruby - hub.docker.com/search?q=ruby:
Search can also be performed in the Terminal:
docker search ubuntu
NAME                             DESCRIPTION                                     STARS     OFFICIAL   AUTOMATED
ubuntu                           Ubuntu is a Debian-based Linux operating sys…   16819     [OK]
websphere-liberty                WebSphere Liberty multi-architecture images …   296       [OK]
open-liberty                     Open Liberty multi-architecture images based…   62        [OK]
neurodebian                      NeuroDebian provides neuroscience research s…   106       [OK]
ubuntu-debootstrap               DEPRECATED; use "ubuntu" instead                52        [OK]
ubuntu-upstart                   DEPRECATED, as is Upstart (find other proces…   115       [OK]
ubuntu/nginx                     Nginx, a high-performance reverse proxy & we…   111
ubuntu/squid                     Squid is a caching proxy for the Web. Long-t…   76
ubuntu/cortex                    Cortex provides storage for Prometheus. Long…   4
ubuntu/prometheus                Prometheus is a systems and service monitori…   55
ubuntu/apache2                   Apache, a secure & extensible open-source HT…   70
ubuntu/kafka                     Apache Kafka, a distributed event streaming …   38
ubuntu/bind9                     BIND 9 is a very flexible, full-featured DNS…   69
ubuntu/mysql                     MySQL open source fast, stable, multi-thread…   58
ubuntu/zookeeper                 ZooKeeper maintains configuration informatio…   12
ubuntu/postgres                  PostgreSQL is an open source object-relation…   34
ubuntu/redis                     Redis, an open source key-value store. Long-…   22
ubuntu/jre                       Distroless Java runtime based on Ubuntu. Lon…   13
ubuntu/dotnet-aspnet             Chiselled Ubuntu runtime image for ASP.NET a…   17
ubuntu/grafana                   Grafana, a feature rich metrics dashboard & …   9
ubuntu/dotnet-deps               Chiselled Ubuntu for self-contained .NET & A…   13
ubuntu/memcached                 Memcached, in-memory keyvalue store for smal…   5
ubuntu/dotnet-runtime            Chiselled Ubuntu runtime image for .NET apps…   14
ubuntu/prometheus-alertmanager   Alertmanager handles client alerts from Prom…   9
ubuntu/cassandra                 Cassandra, an open source NoSQL distributed …   2
3.3 List Images
The list of all locally available images will show our app (my-app) as well the 2 versions of Ubuntu we just pulled:
docker images
REPOSITORY   TAG       IMAGE ID       CREATED          SIZE
my-app       latest    cfd4dcdda3ea   19 minutes ago   146MB
ubuntu       latest    9cbdd1f76112   2 weeks ago      69.2MB
ubuntu       20.04     f8b1498b9544   2 weeks ago      65.7MB
To only display image with a certain name and tag:
docker images ubuntu
REPOSITORY   TAG       IMAGE ID       CREATED       SIZE
ubuntu       latest    9cbdd1f76112   2 weeks ago   69.2MB
ubuntu       20.04     f8b1498b9544   2 weeks ago   65.7MB
3.4 Dockerfile
As we saw in the previous chapter, an image is created using the instructions specified in the Dockerfile – think of it as the blueprint for your image.
NB: The name
Dockerfileis a convention and people can and do use variations of this name.
The Dockerfile is a simple text file, added to your web application, and contains instructions to be used by Docker to package the application into a Docker image. The instructions are followed in a sequential manner, and each creates a ‘layer’ in the image – with the top layer being the one accessible at the end of the container creation process.
3.4.1 Anatomy of a Dockerfile
Not all the components below are required – a Dockerfile should be individually optimized for the application and environment they are meant for.
#1. Build Arguments – reusable configuration values
ARG UBUNTU_VERSION=22.04
#2. Base Image - specify the starting point for our image:
FROM ubuntu:22.04
A constant can also be used for version:
FROM ubuntu:${UBUNTU_VERSION}
#3. Meta – various pieces of info associated with the image
LABEL version="1.0"
LABEL description="A custom image"
#4. Set Environment Variables – are packaged with the image, so the image will have to be recreated if they change. Only store variables that are not changing for the same version of your app – eg: APP_VERSION:
ENV APP_VERSION 1.0.0
ENV APP_HOME /app
Inside the container shell itself, they can be accessed as system environment variables.
#5. System Commands – run commands to ensure the required dependencies are available. The commands are executed in the context of the image and don’t have access to the host filesystem (your computer).
RUN apt update -y \
  && apt upgrade -y \
  && apt clean \
  && apt install -y nginx
RUN mkdir -p ${APP_HOME}
USER deploy
#6. Prepare the App – create the app folder and copy files across. Finally, run the prep commands:
WORKDIR ${APP_HOME}
COPY . .
RUN npm install
#7. Exposed ports – these instructions doesn’t actually do anything security-wise but signpost what ports will be opened:
EXPOSE 3000
#8. Healthcheck - Health check for a container built from the image
HEALTHCHECK --interval=30s --timeout=30s --start-period=5s --retries=3 \
  CMD curl -f http://localhost:3000/up || exit 1
#9. Run the server – the actual command that starts the server
CMD ["npm", "start"]
NB: The contents of
CMDcould also be used via aRUNcommand. However,CMDis how we tell Docker this is the entry point command.
#10. ONBUILD - set default values for build-time arguments
ONBUILD ARG build_env
ONBUILD RUN echo "Building in $build_env environment"
3.5 Interactive Mode
A great way to build an image is via the interactive mode – allows you to run the commands in the shell directly in a container (we’ll discuss containers in the next chapter). The flow is:
- Start with a known base image.
- Run commands as required.
- Save the new image.
To start:
docker run -it ubuntu:latest /bin/bash
root@01e4f416f995:/#
Docker run flags used are -i for interactive and -t to allocated a pseudo-TTY. You will be dropped in a prompt inside the container, as a root user.
And we can, for example, list all environment variables:
printenv
HOSTNAME=01e4f416f995
PWD=/
HOME=/root
LS_COLORS=rs=0:di=01;34:ln=01;36:mh=00:pi=40;33:so=01;35:do=01;35:bd=40;33;01:cd=40;33;01:or=40;31;01:mi=00:su=37;41:sg=30;43:ca=30;41:tw=30;42:ow=34;42:st=37;44:ex=01;32:*.tar=01;31:*.tgz=01;31:*.arc=01;31:*.arj=01;31:*.taz=01;31:*.lha=01;31:*.lz4=01;31:*.lzh=01;31:*.lzma=01;31:*.tlz=01;31:*.txz=01;31:*.tzo=01;31:*.t7z=01;31:*.zip=01;31:*.z=01;31:*.dz=01;31:*.gz=01;31:*.lrz=01;31:*.lz=01;31:*.lzo=01;31:*.xz=01;31:*.zst=01;31:*.tzst=01;31:*.bz2=01;31:*.bz=01;31:*.tbz=01;31:*.tbz2=01;31:*.tz=01;31:*.deb=01;31:*.rpm=01;31:*.jar=01;31:*.war=01;31:*.ear=01;31:*.sar=01;31:*.rar=01;31:*.alz=01;31:*.ace=01;31:*.zoo=01;31:*.cpio=01;31:*.7z=01;31:*.rz=01;31:*.cab=01;31:*.wim=01;31:*.swm=01;31:*.dwm=01;31:*.esd=01;31:*.jpg=01;35:*.jpeg=01;35:*.mjpg=01;35:*.mjpeg=01;35:*.gif=01;35:*.bmp=01;35:*.pbm=01;35:*.pgm=01;35:*.ppm=01;35:*.tga=01;35:*.xbm=01;35:*.xpm=01;35:*.tif=01;35:*.tiff=01;35:*.png=01;35:*.svg=01;35:*.svgz=01;35:*.mng=01;35:*.pcx=01;35:*.mov=01;35:*.mpg=01;35:*.mpeg=01;35:*.m2v=01;35:*.mkv=01;35:*.webm=01;35:*.webp=01;35:*.ogm=01;35:*.mp4=01;35:*.m4v=01;35:*.mp4v=01;35:*.vob=01;35:*.qt=01;35:*.nuv=01;35:*.wmv=01;35:*.asf=01;35:*.rm=01;35:*.rmvb=01;35:*.flc=01;35:*.avi=01;35:*.fli=01;35:*.flv=01;35:*.gl=01;35:*.dl=01;35:*.xcf=01;35:*.xwd=01;35:*.yuv=01;35:*.cgm=01;35:*.emf=01;35:*.ogv=01;35:*.ogx=01;35:*.aac=00;36:*.au=00;36:*.flac=00;36:*.m4a=00;36:*.mid=00;36:*.midi=00;36:*.mka=00;36:*.mp3=00;36:*.mpc=00;36:*.ogg=00;36:*.ra=00;36:*.wav=00;36:*.oga=00;36:*.opus=00;36:*.spx=00;36:*.xspf=00;36:
TERM=xterm
SHLVL=1
PATH=/usr/local/sbin:/usr/local/bin:/usr/sbin:/usr/bin:/sbin:/bin
_=/usr/bin/printenv
To exit the container, use the exit command.
3.6 Building an Image
A tag is specified during a build – this is a label applied to an image, usually used for versioning. Back in Terminal, and inside the my-app folder of the previous chapter, run:
docker build -t my-app:0.0.1 .
[+] Building 1.1s (10/10) FINISHED                         docker:desktop-linux
 => [internal] load build definition from Dockerfile                       0.0s
 => => transferring dockerfile: 233B                                       0.0s
 => [internal] load metadata for docker.io/library/node:alpine             1.0s
 => [auth] library/node:pull token for registry-1.docker.io                0.0s
 => [internal] load .dockerignore                                          0.0s
 => => transferring context: 2B                                            0.0s
 => [1/4] FROM docker.io/library/node:alpine@sha256:4cc2d9f365691fc6f8fe2  0.0s
 => [internal] load build context                                          0.0s
 => => transferring context: 565B                                          0.0s
 => CACHED [2/4] COPY package.json .                                       0.0s
 => CACHED [3/4] RUN npm install                                           0.0s
 => CACHED [4/4] COPY index.js .                                           0.0s
 => exporting to image                                                     0.0s
 => => exporting layers                                                    0.0s
 => => writing image sha256:cfd4dcdda3ea57fca338172c72599dd2dcebd89dc0ef4  0.0s
 => => naming to docker.io/library/my-app:0.0.1                            0.0s

View build details: docker-desktop://dashboard/build/desktop-linux/desktop-linux/k77xljflq8akprd0vsm9b7l43
The format is:
docker build -t app-name:app-version path/to/Dockerfile
Our app now has its version as a tag:
docker images
REPOSITORY   TAG       IMAGE ID       CREATED          SIZE
my-app       0.0.1     cfd4dcdda3ea   22 minutes ago   146MB
my-app       latest    cfd4dcdda3ea   22 minutes ago   146MB
ubuntu       latest    9cbdd1f76112   2 weeks ago      69.2MB
ubuntu       20.04     f8b1498b9544   2 weeks ago      65.7MB
3.7 Tagging Images
Existing images can be retagged via the docker tag command:
docker tag existing-tag new-tag:new-version
We can retag our initial app version with a 1.0.0 tag:
docker tag my-app:0.0.1 my-app:1.0.0or create a new image entirely:
docker tag my-app:0.0.1 another-app:1.0.0Result:
docker images
REPOSITORY    TAG       IMAGE ID       CREATED          SIZE
another-app   1.0.0     cfd4dcdda3ea   23 minutes ago   146MB
my-app        0.0.1     cfd4dcdda3ea   23 minutes ago   146MB
my-app        1.0.0     cfd4dcdda3ea   23 minutes ago   146MB
my-app        latest    cfd4dcdda3ea   23 minutes ago   146MB
ubuntu        latest    9cbdd1f76112   2 weeks ago      69.2MB
ubuntu        20.04     f8b1498b9544   2 weeks ago      65.7MB
Tags are also used when pushing images to Docker registries. A tag can specify which version of the image is pushed to the registry:
docker tag local-name:local-tag docker-username/docker-name:docker-tag
In our case:
docker tag my-app:0.0.1 pardel/my-app:0.0.1And then push to Docker:
docker push pardel/my-app:0.0.1
The push refers to repository [docker.io/pardel/my-app]
f7e6aab43207: Pushed
3ce0e2226b79: Pushed
b6e3cdb74a49: Pushed
bb9edd41d0b2: Pushed
cd474caba5a8: Pushed
7a63569d0bbd: Pushed
b09314aec293: Pushed
0.0.1: digest: sha256:9c7c09a8d3d6156148dfc404792d6b01e952541e6b1fdc8fe7a903c10f495b26 size: 1783
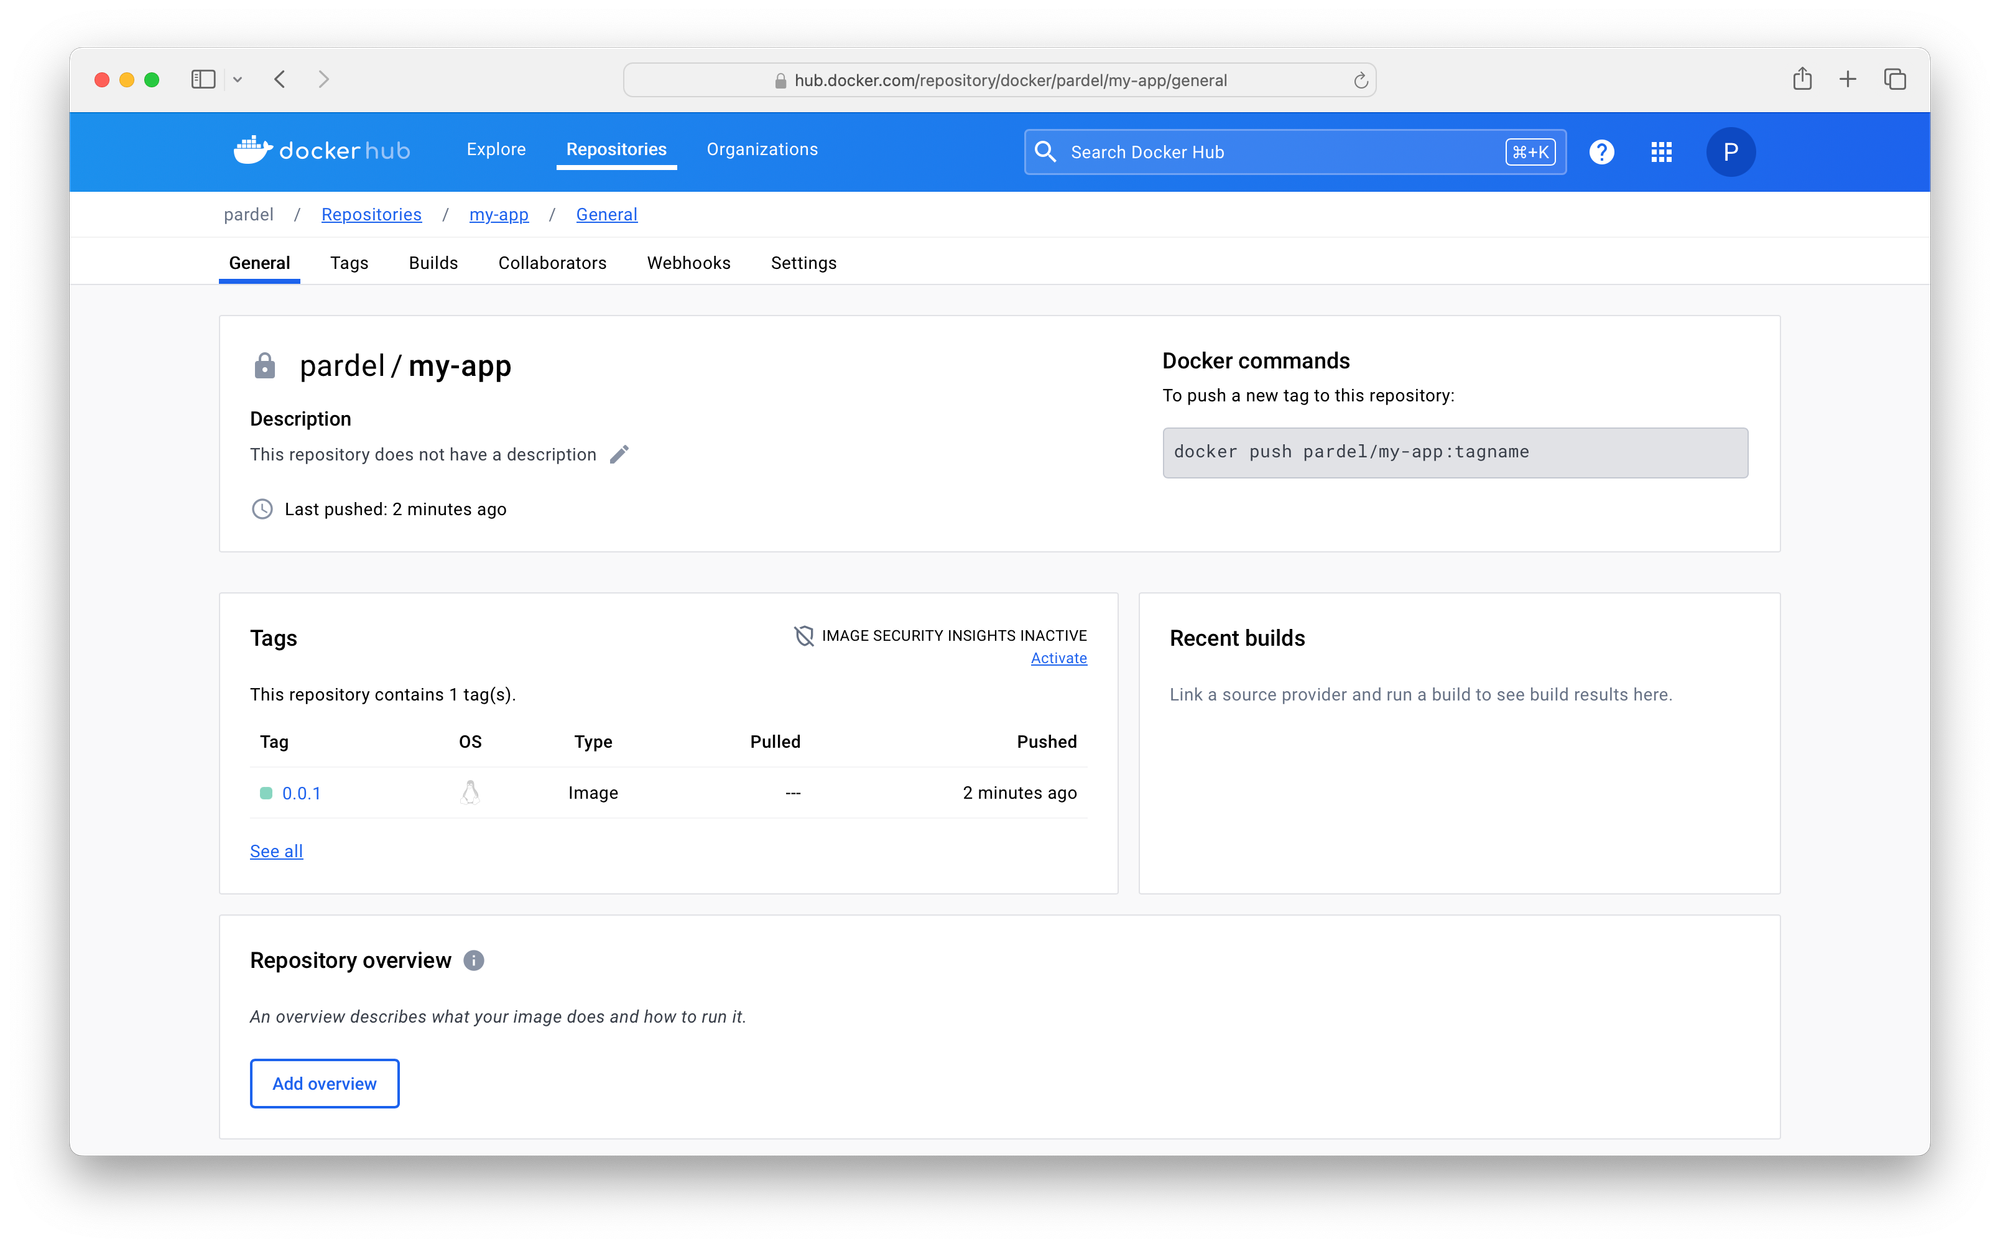
Your DockerHub account should now include a version 0.0.1 for the my-app repository:
3.8 Inspect Image
If you forgot what an image is or would like more detailed information about one, you can use inspect (tag is optional and “latest” is used if not specified:
docker image inspect my-app:0.0.1
[
    {
        "Id": "sha256:cfd4dcdda3ea57fca338172c72599dd2dcebd89dc0ef49037d05894f8d6f891a",
        "RepoTags": [
            "another-app:1.0.0",
            "my-app:0.0.1",
            "my-app:1.0.0",
            "my-app:latest",
            "pardel/my-app:0.0.1"
        ],
        "RepoDigests": [
            "pardel/my-app@sha256:9c7c09a8d3d6156148dfc404792d6b01e952541e6b1fdc8fe7a903c10f495b26"
        ],
        ...
        "Architecture": "arm64",
        "Variant": "v8",
        "Os": "linux",
        "Size": 145824081,
        "VirtualSize": 145824081,
        ...
        "Metadata": {
            "LastTagTime": "2024-02-08T20:31:21.406574968Z"
        }
    }
]
Output is a JSON array that includes metadata (ID, tags, creation time, env variables, OS, ports, etc.).
Another way to find information on an image is via the history command:
docker image history ubuntu
IMAGE          CREATED       CREATED BY                                      SIZE      COMMENT
9cbdd1f76112   2 weeks ago   /bin/sh -c #(nop)  CMD ["/bin/bash"]            0B
<missing>      2 weeks ago   /bin/sh -c #(nop) ADD file:1bffdeb50a8b94d63…   69.2MB
<missing>      2 weeks ago   /bin/sh -c #(nop)  LABEL org.opencontainers.…   0B
<missing>      2 weeks ago   /bin/sh -c #(nop)  LABEL org.opencontainers.…   0B
<missing>      2 weeks ago   /bin/sh -c #(nop)  ARG LAUNCHPAD_BUILD_ARCH     0B
<missing>      2 weeks ago   /bin/sh -c #(nop)  ARG RELEASE                  0B
3.9 Remove Images
A clean-up is required every so often 😄:
docker image rm name:tag
Docker provides a shortcut:
docker rmi name:tag
Instead of a name:tag combination, one can specify the image id or enough of it so it’s identifiable. Given the following images:
docker images
REPOSITORY      TAG       IMAGE ID       CREATED          SIZE
another-app     1.0.0     cfd4dcdda3ea   30 minutes ago   146MB
my-app          0.0.1     cfd4dcdda3ea   30 minutes ago   146MB
my-app          1.0.0     cfd4dcdda3ea   30 minutes ago   146MB
my-app          latest    cfd4dcdda3ea   30 minutes ago   146MB
pardel/my-app   0.0.1     cfd4dcdda3ea   30 minutes ago   146MB
ubuntu          latest    9cbdd1f76112   2 weeks ago      69.2MB
ubuntu          20.04     f8b1498b9544   2 weeks ago      65.7MB
We can delete images the following ways:
docker rmi my-app
Untagged: my-app:latest
docker rmi another-app:1.0.0
Untagged: another-app:1.0.0
docker rmi f8
Untagged: ubuntu:20.04
Untagged: ubuntu@sha256:bb1c41682308d7040f74d103022816d41c50d7b0c89e9d706a74b4e548636e54
Deleted: sha256:f8b1498b9544ea65cbf02fb2feb0eea5a8af4f02097cb5447ec566061ff245c0
Deleted: sha256:956c99b07a411a286d30e71338d3057196d7edbe72fe5f13f51008029cc0ffdf
Notice that the first 2 commands remove the tag only whilst the last one also clear the image. This happens when there is no other tag for a particular image.
3.9.1 Force removal
We’ll discuss containers in the next chapter – containers link to images and when this happens, the images can only be deleted by using the force option – this deletes both images and the associated containers in one go:
docker image rm name:tag -force
4. Docker Containers
Docker containers are self-contained runnable instance of a Docker image. When you start a container, it executes the application in the environment defined by the image, ensuring consistency in execution, regardless of where it’s run.
- Share the host system’s kernel and do not need the full OS hence - lightweight.
- Operate independently of other containers and the host system – isolation.
- Contain all the necessary components to run the app they were created for – self-contained.
Although, you can think of a container as a box, they are in fact processes running on the hosting machine.
## 4.1 Create a Container
docker container create –-name container-name image-name:image-tag
We’ll create one based on one of the previous images we created:
docker container create --name my-awesome-app my-app:0.0.1
f41e92bdb8af4c39264b125b7083efcf5f9b8074d675e29dcefcd207a57bda95
If a name is not specified, a random one is assigned.
docker container create my-app:0.0.1
8b5b20011218fca720b9a4845004b44eea7232a23fe6f009c5a8aa21824d8a3f
4.2 List Containers
To list all created containers:
docker container ls -a
CONTAINER ID   IMAGE           COMMAND                  CREATED              STATUS                     PORTS     NAMES
8b5b20011218   my-app:0.0.1    "docker-entrypoint.s…"   46 seconds ago       Created                              funny_shirley
f41e92bdb8af   my-app:0.0.1    "docker-entrypoint.s…"   About a minute ago   Created                              my-awesome-app
01e4f416f995   ubuntu:latest   "/bin/bash"              2 hours ago          Exited (0) 2 hours ago               stupefied_nash
6de639cc93b4   cfd4dcdda3ea    "docker-entrypoint.s…"   2 hours ago          Exited (137) 2 hours ago             heuristic_kalam
The
-aflag is important; without it, only the currently running containers will be shows.
## 4.3 Start and Stop Containers
When created, a container is stopped and can be started:
docker container start my-awesome-app
my-awesome-app
You will see the status of the my-awesome-app container changing from “Created” to “Up”:
docker container ls -a
CONTAINER ID   IMAGE           COMMAND                  CREATED         STATUS                     PORTS      NAMES
8b5b20011218   my-app:0.0.1    "docker-entrypoint.s…"   4 minutes ago   Created                               funny_shirley
f41e92bdb8af   my-app:0.0.1    "docker-entrypoint.s…"   4 minutes ago   Up 52 seconds              3000/tcp   my-awesome-app
01e4f416f995   ubuntu:latest   "/bin/bash"              2 hours ago     Exited (0) 2 hours ago                stupefied_nash
6de639cc93b4   cfd4dcdda3ea    "docker-entrypoint.s…"   2 hours ago     Exited (137) 2 hours ago              heuristic_kalam
Unsurprisingly, a running container can be stopped - it might take couple of seconds for the operation to complete, so please be patient:
docker container stop my-awesome-app
my-awesome-app
The my-awesome-app container status changes to “Exited”:
docker container ls -a
CONTAINER ID   IMAGE           COMMAND                  CREATED         STATUS                            PORTS     NAMES
8b5b20011218   my-app:0.0.1    "docker-entrypoint.s…"   8 minutes ago   Created                                     funny_shirley
f41e92bdb8af   my-app:0.0.1    "docker-entrypoint.s…"   8 minutes ago   Exited (137) About a minute ago             my-awesome-app
01e4f416f995   ubuntu:latest   "/bin/bash"              2 hours ago     Exited (0) 2 hours ago                      stupefied_nash
6de639cc93b4   cfd4dcdda3ea    "docker-entrypoint.s…"   2 hours ago     Exited (137) 2 hours ago                    heuristic_kalam
The start, restart and stop commands also work without specifying the container part:
docker start my-awesome-app
my-awesome-app
There is also a restart command – used to restart a container already running or stopped. It stops the running container and then starts it again, effectively refreshing the container’s state while maintaining its configuration and any data stored in its persistent storage.
docker restart --time 10 my-awesome-app
my-awesome-app
The
--timeparameter specified the number of seconds to wait before killing the container, giving it time to shut down in an orderly fashion.
4.4 Run = Create + Start
The run command we used in the previous chapter, is equivalent to a create and then start. If an image is not available locally, it will be searched on Docker Hub and pulled.
docker container run –name container-name image-name:version
Here is an example of starting a container based on the redis image (hub.docker.com/_/redis):
docker restart --time 10 my-awesome-app
my-awesome-app
paul@EN52 my-app % docker run --name my-app-redis -d redis
Unable to find image 'redis:latest' locally
latest: Pulling from library/redis
25d3892798f8: Pull complete
e5d458cf0bea: Pull complete
5f6ae8126b8f: Pull complete
c1b1c9c7fe0c: Pull complete
3b0bca0ecfe5: Pull complete
7d0a39b44797: Pull complete
4f4fb700ef54: Pull complete
8249a387d011: Pull complete
Digest: sha256:11c3e418c29672341be9a8e3015d96f05b88e5ad58829885d36f8342b4da13c2
Status: Downloaded newer image for redis:latest
7d30c03e8e52c1adea8c624f753111dd8b9b184bfd298625d0626a422f7d7532
NB: The
containerpart is optional and the-dstart the service as deamon. We can list all running containers:
docker container ls
CONTAINER ID   IMAGE          COMMAND                  CREATED              STATUS              PORTS      NAMES
7d30c03e8e52   redis          "docker-entrypoint.s…"   About a minute ago   Up About a minute   6379/tcp   my-app-redis
f41e92bdb8af   my-app:0.0.1   "docker-entrypoint.s…"   18 minutes ago       Up 7 minutes        3000/tcp   my-awesome-app
4.5 Inspect
Sometimes you want to step into an already running container:
docker container attach container-name
To show the container logs:
docker logs my-app-redis
1:C 08 Feb 2024 22:41:21.185 * oO0OoO0OoO0Oo Redis is starting oO0OoO0OoO0Oo
1:C 08 Feb 2024 22:41:21.185 * Redis version=7.2.4, bits=64, commit=00000000, modified=0, pid=1, just started
1:C 08 Feb 2024 22:41:21.185 ## Warning: no config file specified, using the default config. In order to specify a config file use redis-server /path/to/redis.conf
1:M 08 Feb 2024 22:41:21.185 * monotonic clock: POSIX clock_gettime
1:M 08 Feb 2024 22:41:21.186 * Running mode=standalone, port=6379.
1:M 08 Feb 2024 22:41:21.186 * Server initialized
1:M 08 Feb 2024 22:41:21.186 * Ready to accept connections tcp
Logs can be streamed by using the
-fflag.
To list the mapped ports:
docker  port my-awesome-app
3000/tcp -> 0.0.0.0:3000
Run a command inside a container:
docker exec -it container-name command
docker exec -it my-awesome-app ls -al
total 108
drwxr-xr-x    1 root     root          4096 Feb  8 22:24 .
drwxr-xr-x    1 root     root          4096 Feb  8 22:24 ..
-rwxr-xr-x    1 root     root             0 Feb  8 22:24 .dockerenv
drwxr-xr-x    1 root     root          4096 Jan 30 20:20 bin
drwxr-xr-x    5 root     root           340 Feb  8 22:46 dev
drwxr-xr-x    1 root     root          4096 Feb  8 22:24 etc
drwxr-xr-x    1 root     root          4096 Jan 30 19:43 home
-rw-r--r--    1 root     root           215 Jan 27 11:18 index.js
drwxr-xr-x    1 root     root          4096 Jan 30 20:20 lib
drwxr-xr-x    5 root     root          4096 Jan 26 17:55 media
drwxr-xr-x    2 root     root          4096 Jan 26 17:55 mnt
drwxr-xr-x   65 root     root          4096 Feb  8 20:07 node_modules
drwxr-xr-x    1 root     root          4096 Jan 30 20:20 opt
-rw-r--r--    1 root     root         24941 Feb  8 20:07 package-lock.json
-rw-r--r--    1 root     root           270 Jan 27 10:48 package.json
dr-xr-xr-x  240 root     root             0 Feb  8 22:46 proc
drwx------    1 root     root          4096 Jan 30 20:20 root
drwxr-xr-x    2 root     root          4096 Jan 26 17:55 run
drwxr-xr-x    2 root     root          4096 Jan 26 17:55 sbin
drwxr-xr-x    2 root     root          4096 Jan 26 17:55 srv
dr-xr-xr-x   11 root     root             0 Feb  8 22:46 sys
drwxrwxrwt    1 root     root          4096 Jan 30 20:20 tmp
drwxr-xr-x    1 root     root          4096 Jan 30 20:20 usr
drwxr-xr-x   12 root     root          4096 Jan 26 17:55 var
Interactive terminal
A common case is accessing the container – we can do that by running a shell, in the case below /bin/sh:
 docker exec -it my-awesome-app /bin/sh
/ #
This will take drop us into a shell in that container – once there we can use it as we would use a shell. For example, to inspect the container’s environment variables:
env
NODE_VERSION=21.6.1
HOSTNAME=f41e92bdb8af
YARN_VERSION=1.22.19
SHLVL=1
HOME=/root
TERM=xterm
PATH=/usr/local/sbin:/usr/local/bin:/usr/sbin:/usr/bin:/sbin:/bin
PWD=/
To exit:
exit
pardel@dev %
4.6 Rename
docker rename my-awesome-app my-app
docker container ls -a
CONTAINER ID   IMAGE           COMMAND                  CREATED          STATUS                     PORTS      NAMES
7d30c03e8e52   redis           "docker-entrypoint.s…"   27 minutes ago   Up 18 minutes              6379/tcp   my-app-redis
8b5b20011218   my-app:0.0.1    "docker-entrypoint.s…"   44 minutes ago   Created                               funny_shirley
f41e92bdb8af   my-app:0.0.1    "docker-entrypoint.s…"   44 minutes ago   Up 22 minutes              3000/tcp   my-app
01e4f416f995   ubuntu:latest   "/bin/bash"              3 hours ago      Exited (0) 3 hours ago                stupefied_nash
6de639cc93b4   cfd4dcdda3ea    "docker-entrypoint.s…"   3 hours ago      Exited (137) 3 hours ago              heuristic_kalam
4.7 Delete
It can be done with either the container name or id and the container should be stopped, otherwise it will be terminated:
docker rm 01e4f416f995
01e4f416f995
To gracefully shutdown a container:
docker kill --signal=SIGTERM my-app-redis
my-app-redis
To remove all stopped containers:
docker container prune
WARNING! This will remove all stopped containers.
Are you sure you want to continue? [y/N] y
Deleted Containers:
7d30c03e8e52c1adea8c624f753111dd8b9b184bfd298625d0626a422f7d7532
8b5b20011218fca720b9a4845004b44eea7232a23fe6f009c5a8aa21824d8a3f
6de639cc93b450763d590d9e17d0b851b04b4faa3f53edb8f0b6d4a4c2c2f621

Total reclaimed space: 0B